| Home | Gallery | Services | Customer Comments | Contact | Press | Videos | Make Your Own! |
|
|
||||||||||
|
||||||||||
|
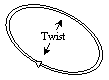
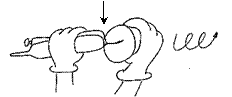
Rule #1When blowing up your balloon you need to think about two things, how much air you need for the bubbles you want to make, and how much of the balloon you need to leave un-inflated (this is called "the tail"). Every time you make a twist in the balloon, you will push the air down the balloon and use up some of your tail. The more twists your balloon model needs, the more of a tail you have to leave.* Example: A dog with three twists, you need to leave a 2" - 3" tail. For a monkey, which has twelve bubbles, you would leave a 6"- 7" tail. Rule #2- A twist will always come untwisted unless you "lock" the twist into something. That something is usually another twist. Sometimes it can be another balloon, if your model calls for more than one.To make a twist: measure (by eye - no rulers) the length of the bubble that you want. At that point, squeeze the inflated balloon between your fingers and twist the balloon six times. The reason for six? When you twist, you are most likely twisting a half turn, twisting six times, gets you three full turns. And three is a magic number - don't ask me why. !!! HINT ALERT !!! Always twist in the same direction. This will ensure that, as you twist a few bubbles they won't come untwisted before you can lock them. And it will allow you to undo what you have done if you need to change something. Trust me on this. Another, less important hint: When twisting a series of bubbles, like when making the poodle head, I hold the first twist in between my pinky and my ring finger, tucked all the way against my hand. By holding the first and last bubble in a series, no matter how long, they will not come undone - as long as you remembered to always twist in the same direction (like how I snuck that in again?). Also, for now, always work from the nozzle end, toward the tail.And now, some basic twists...The Flower Petal (or Loop Twist)The most basic of twists. You can create the industry standard dog using only three of these twists. Once the balloon has been inflated and tied off. Move down the balloon 3" away from the knot. Make your first twist - when I say twist, I mean six times as explained in Rule #2 above. 1st, congratulations on a job well done. 2nd, holding on to the first twist, make a second twist 3" further down the balloon. You now have - like the picture below - a 3" bubble with a twist on either side. Holding both twists, fold that bubble in half so that the twist line up and twist the two twists together (say that five times fast). 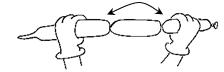
 |
The Lock TwistThe second most basic of twists. This is going to be much like the flower petal, except we are going to make three separate twists. Like this, 3" down from the nozzle, make a twist. Hold that twist. Move your other hand 3" down the balloon and make a twist. slide the same hand down the balloon another 3" (if your twisted in the same direction, the twists will stay in place), make a third twist. You now have what looks like links of sausage. Bend the balloons at the middle twist, and line up the first and last twists. Twist them together. The friction of the balloons will hold the middle twist in place at the top of those two bubbles. 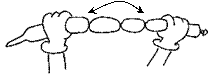

The Pinch Twist (or Ear Twist)Just like the flower petal, but this time, you not going to make a 3" bubble. Move 3" down from the knot and twist. Give the balloon a squeeze so the air moves down towards the un-inflated end. Move only 1" down the balloon, make another twist. You now have a 1" bubble. Fold the balloon so it is lying against itself with your 1" bubble at the end. Gently pull your 1" bubble away from the balloon and twist the two twists together. Notice that the more you twist the more like a teddy bear ear it starts to look. 

Let's make some stuff...Dog - It's a classic.Here's a guideline that, with a little practice, you'll understand: Step 1 - Inflate the balloon leaving a six inch tail, allow a little air to escape before knotting it.Make a 3" bubble by moving 3" down the balloon - away from the knot. Make another 3" bubble, twist; make another 3" bubble and twist. You should have exactly what you had when practicing the lock twist. Line up the first and last twists and twist them together. You now have the head (with the knot for the nose), and the ears of a dog. Step 2 - Make a 1" bubble and twist. Put this twist in between your pinky finger and ring finger to hold it. Make a 3" bubble, twist. Another 3" bubble, twist. Fold your balloon so that your 3" bubbles are lying side by side, twist the last twist in to the bottom of the 1" bubble. 
The 1" bubble is the neck of your dog. The two 3" bubbles are its front legs. 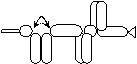
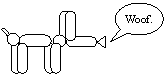
Now, use a sharpie marker - careful, they stain - to add some eyes and a mouth to your dog. If you have a red sharpie, why not add a tongue? Artwork detail can really add life to your sculptures. SwordThe main thing to remember when making a sword, don't make them too sharp or you'll pop the balloon. Step 1 - Inflate the balloon leaving a 1" inch tail, allow a little air to escape before knotting it.Step 2 - Make a twist 8" away from the knot. Make a flower petal by twisting the knot of the balloon into that twist.  Step 3 - Make a 1" Pinch Twist (a 1" bubble, then twist both sides of that bubble together).
 Step 4 - Make a 6" bubble
Step 5 - Make a 1" Pinch Twist  Step 6 - Your balloon should be fully inflated now, Take the tip of the balloon and push it through the 8" Flower Petal you made in Step 1. Leave 4" on one side of the flower petal for the handle.
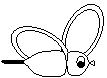
 Massage the 6" bubble you made in Step 4 to arch out a bit and keep your 4" handle straight. No artwork required on this one, just start swinging! Bumble BeeThere are few different types of Specialty Shaped balloons out there. There are some that are slightly wider (3" wide when inflated) and they have a black tip on the end. These are called bee-body balloons. To make a Bee, you will need one bee body balloon and one long skinny balloon (this one is called a 260, because when it is fully inflated it is 2" wide and 60" long). I will be adding more instructions on my website. In the meantime, your local library has books about twisting balloon animals - check 'em out! And above all, HAVE FUN! |
| Phone: 603.491.9018 | Contact |
| © 2008 ImNotaClown.com | Terms |